Webpack的使用
[[toc]]
优化速度
1.异步加载模块
2.提取第三库
3.代码压缩
4.去除不必要的插件
5.图片base64
6.按需加载
7.开启Gzip压缩
8.多进程打包
|
splitChunks分割拆包
chunk-vendors.js 简介
顾名思义,chunk-vendors.js 是捆绑所有不是自己的模块,而是来自其他方的模块的捆绑包,它们称为 第三方模块或供应商模块。
通常,它意味着(仅和)来自项目 /node_modules 目录的所有模块,会将所有 /node_modules 中的第三方包打包到 chunk-vendors.js 中。
将所有的第三方包集中到一个文件,自然也会出现文件过大的问题。
- Webpack4之SplitChunksPlugin
- Webpack3的CommonsChunkPlugin(已废弃)
{
splitChunks: {
chunks: 'all',
minSize: 30000,
maxSize: 0,
minChunks: 1,
maxAsyncRequests: 5,
maxInitialRequests: 3,
automaticNameDelimiter: '~',
name: true,
cacheGroups: {
styles: { name: 'styles', test: /\.css$/, chunks: 'all', enforce: true },
common: {
name: 'common',
chunks: 'all',
test: /[\\/]node_modules[\\/](react|react-dom|react-router|react-router-dom)[\\/]/,
priority: 10,
enforce: true,
reuseExistingChunk: true
},
antd: {
name: 'antd',
chunks: 'all',
test: /[\\/]node_modules[\\/](@ant-design|antd)[\\/]/,
priority: -10,
enforce: true,
reuseExistingChunk: true
},
excel: {
name: 'excel',
chunks: 'all',
test: /[\\/]node_modules[\\/](js-export-excel)[\\/]/,
priority: -20,
enforce: true,
reuseExistingChunk: true
},
echarts: {
name: 'echarts',
chunks: 'async',
test: /[\\/]node_modules[\\/](echarts|echarts-for-react)[\\/]/,
priority: 80,
enforce: true,
reuseExistingChunk: true
}
},
runtimeChunk: {
name: "manifest"
}
}
|

记一次拆包遇到的坑
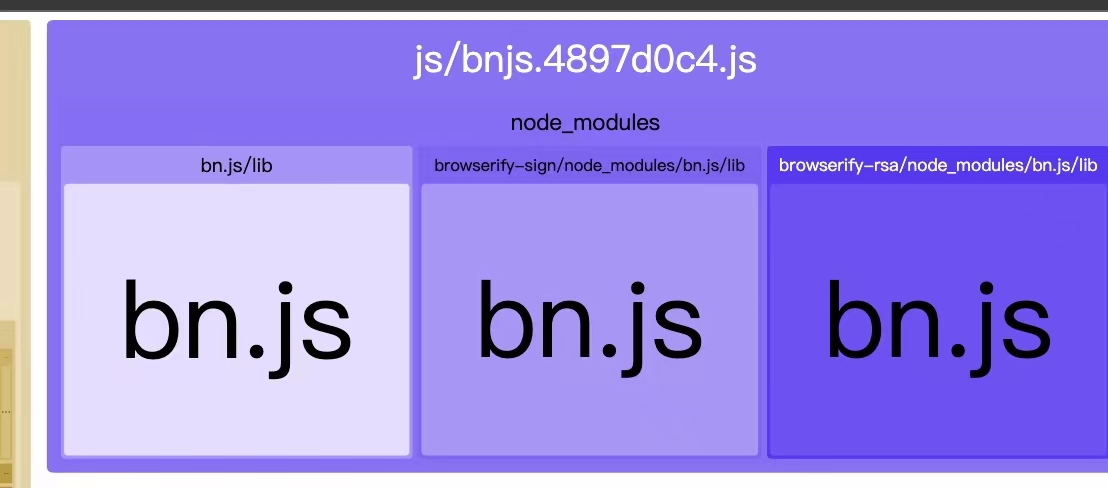
最近一个需求把页面多处 bn.js 分割出来,抽离到一个单独的js中,使用 SplitChunksPlugin 做了分割之后,发一个一个问题 如下图
最后定位到的问题是因为项目中用了 crypto-js 加密组件,这个模块存在一个bug导致webpack会把原生crypto模块打包进来,导致项目 polyfile 后包的体积大了400多k。跑题了,为什么出现 bn.js 抽离后还是冗余在一起的问题
cryptojs 兼容 nodeJs 的写法 既可以在浏览器中使用也可以在服务端使用,间接导致出现很多个 bn.js。
直接抽离会有上图bug,因为有的包在node环境下webpack不认 会导致一个bn.js被抽离多次。解决办法就是统一出口,统一用一个bn.js 包然后在进行分割。
alias: {
'bn.js': path.resolve(process.cwd(), 'node_modules', 'bn.js'),
}
bn: {
name: 'bnjs',
chunks: 'initial',
test: /[\\/]node_modules[\\/](bn.js)[\\/]/,
priority: 1,
enforce: true,
reuseExistingChunk: true
},
|
做到这里还没完,不然项目启动的时候会出现白屏的情况。 需要把分割后的 chunk-bnjs 引入到 HtmlWebpackPlugin 的 chunk 中.
new HtmlWebpackPlugin({
...
chunks: ['manifest','chunk-bnjs']
})
|
vue-cli 直接在 pages 对象中添加即可.
参考资料
https://github.com/brix/crypto-js/issues/276
https://github.com/NervJS/taro/issues/8169
https://github.com/TencentCloudBase/cloudbase-js-sdk/issues/1
外部扩展(Externals)
externals 配置选项提供了「从输出的 bundle 中排除依赖」的方法。相反,所创建的 bundle 依赖于那些存在于用户环境(consumer’s environment)中的依赖。
此功能通常对 library 开发人员来说是最有用的,然而也会有各种各样的应用程序用到它。
防止将某些 import 的包(package)打包到 bundle 中,而是在运行时(runtime)再去从外部获取这些扩展依赖
例如,从 CDN 引入 jQuery,而不是把它打包:
index.html
<script
  src="https://code.jquery.com/jquery-3.1.0.js"
  integrity="sha256-slogkvB1K3VOkzAI8QITxV3VzpOnkeNVsKvtkYLMjfk="
  crossorigin="anonymous"
></script>
|
webpack.config.js
module.exports = {
externals: {
jquery: 'jQuery',
},
};
|
这样就剥离了那些不需要改动的依赖模块,换句话,下面展示的代码还可以正常运行:
import $ from 'jquery';
$('.my-element').animate();
|
上面 webpack.config.js 中 externals 下指定的属性名称 jquery 表示 import $ from 'jquery' 中的模块 jquery 应该从打包产物中排除。 为了替换这个模块,jQuery 值将用于检索全局 jQuery 变量,因为默认的外部库类型是 var
externals 高级配置
上面的 externals 配置都是用的是简单的对象,key 和 value 都是字符串,其实相当于
- root:可以通过一个全局变量访问 library(例如,通过 script 标签)。
- commonjs:可以将 library 作为一个 CommonJS 模块访问。
- commonjs2:和上面的类似,但导出的是 module.exports.default. 模块引入 适合编写组件库
- amd:使用 AMD 模块系统。
webpack 如何处理 externals
定义全局变量(DefinePlugin)
"globals": {
"ENV": true
},
new webpack.DefinePlugin({
ENV: JSON.stringify(process.env.ENV),
}),
|
webpack代理
- webpack-dev-server
const proxy = require('http-proxy-middleware');
module.exports = function (app) {
app.use(
proxy("/pic", {
"target": "http://120.79.229.197:9000",
"changeOrigin": true,
"secure": false,
"pathRewrite": {"^/pic": ""}
})
);
};
|
.babelrc
{{
"presets": [
[
"@babel/preset-env", {
"targets": {
"chrome": 58,
"ie": 11
}
}
], "react-app"],
"plugins": [
["import", {
"libraryName": "antd",
"libraryDirectory": "es",
"style": "css"
}
],
["@babel/plugin-proposal-decorators", { "legacy": true }],
[
"@babel/plugin-transform-runtime",
{
"absoluteRuntime": false,
"corejs": 2,
"helpers": true,
"regenerator": true,
"useESModules": false
}
]
],
"env": {
"production": {
"plugins": ["transform-remove-console"]
}
}
}
|
.env
定义一些环境变量,可以通过process.env.[name]拿取出来
const Dotenv = require("dotenv-webpack");
plugins: [
new Dotenv({
path: env && env !== "development" ? `./.env.${env}` : `./.env`,
}),
],
|
优化输出的文件
taro为例
output: {
filename: 'js/[name].[hash:8].js',
chunkFilename: 'js/[name].[chunkhash:8].js'
},
miniCssExtractPluginOption: {
filename: 'css/[name].[hash:8].css',
chunkFilename: 'css/[name].[chunkhash:8].css'
},
imageUrlLoaderOption: {
limit: 1024*50,
name: 'static/images/[name].[hash:8].[ext]'
},
|
webpack对图片做了什了?(面试题)
url-loader: 如果图片较多,会发很多http请求,会降低页面性能。这个问题可以通过url-loader解决。url-loader会将引入的图片编码,生成dataURl(base64)。相当于把图片数据翻译成一串字符。再把这串字符打包到文件中,最终只需要引入这个文件就能访问图片了。当然,如果图片较大,编码会消耗性能。因此url-loader提供了一个limit参数,小于limit字节的文件会被转为DataURl,大于limit的还会使用file-loader进行copy
file-loader: 解决引用路径的问题,拿background样式用url引入背景图来说,我们都知道,webpack最终会将各个模块打包成一个文件,因此我们样式中的url路径是相对入口html页面的,而不是相对于原始css文件所在的路径的。这就会导致图片引入失败。这个问题是用file-loader解决的,file-loader可以解析项目中的url引入(不仅限于css),根据我们的配置,将图片拷贝到相应的路径,再根据我们的配置,修改打包后文件引用路径,使之指向正确的文件。
image-webpack-loader: 对图片进行压缩和优化
image-webpack-loader
{
test: [/\.bmp$/, /\.gif$/, /\.jpe?g$/, /\.png$/],
use: [
{
loader: require.resolve('url-loader'),
options:
{
name: 'static/images/[name].[hash:8].[ext]',
limit: 1024 * 50,
}
},
]
},
|
webpack用到的插件
webpack-dev-server
clean-webpack-plugin
mini-css-extract-plugin
extract-text-webpack-plugin@next
terser-webpack-plugin/uglifyjs-webpack-plugin
optimize-css-assets-webpack-plugin
image-webpack-loader
webpackbar
dotenv-webpack
@babel/plugin-proposal-decorators(transform-decorators-legacy 基于babel6)
redux-devtools-extension
babel-plugin-transform-remove-console
webpack-bundle-analyzer
happyPack
postcss-loader
postcss-preset-env
postcss-flexbugs-fixes
postcss-px-to-viewport
postcss-pxtorem
|
require.context是什么
一个webpack的api,通过执行require.context函数获取一个特定的上下文,主要用来实现自动化导入模块,在前端工程中,如果遇到从一个文件夹引入很多模块的情况,可以使用这个api,它会遍历文件夹中的指定文件,然后自动导入,使得不需要每次显式的调用import导入模块
import Vue from 'vue'
import Vuex from 'vuex'
import getters from './getters'
const path = require('path')
Vue.use(Vuex)
const files = require.context('./modules', false, /\.js$/)
let modules = {}
files.keys().forEach(key => {
let name = path.basename(key, '.js')
modules[name] = files(key).default || files(key)
})
const store = new Vuex.Store({
modules,
getters
})
export default store
|
端口号被占用
const portfinder = require("portfinder");
devServer: {
port: new Promise((resolve, reject) => {
portfinder.getPort({ port: 9000, stopPort: 9999 }, (err, port) => {
if (port) {
console.log("项目运行端口:" + port);
resolve(port);
} else {
reject(9000);
}
});
}),
proxy: {
"/msg": {
target: "https://www.iowen.cn/jitang/api/",
changeOrigin: true,
secure: false,
pathRewrite: {
"^/msg": "",
},
},
},
},
|